A Practical Guide to Restoring Solid Wood Furniture: Tools, Safety, and First Projects
This feature offers a practical, editorially sharp introduction to breathing new life into salvaged wood. It weaves together methods, safety protocols, and beginner-friendly projects into a clear pathway from assessment to a confident, sailable finish. Built around the themes of sustainability, craftsmanship, and hands-on learning, the guide foregrounds disciplined technique, patient practice, and a careful eye for material history.
Across centuries, artisans have coaxed beauty from timber that others deemed past its prime. The process—assessing wood type, understanding existing finishes, and planning for structural integrity—remains a timeless discipline. The modern reclaimed-workroom uses the same intuition, now sharpened by safety standards, environmental awareness, and accessible tools that empower beginners to take the first confident steps toward restoration.
As you embark, you’ll encounter a spectrum of materials: from classic oak and maple to more exotic grains that reveal stories of provenance. Each piece carries a unique patina that informs your approach to refinishing, stabilization, and protection. The goal is not merely aesthetics but durability—so furniture can endure, function, and continue to tell its tale for generations.
1) Assessing a Salvage Piece: The First Conversation with Wood
Assessment is the hinge on which restoration turns. Begin by identifying the wood type through grain patterns, weight, and scent, then evaluate the existing finish: is it shellac, oil, lacquer, varnish, or wax? Look for signs of movement, such as cracks, warping, or loose joints. A sound assessment establishes whether the project will be a light refinishing or a deeper restoration that requires structural reinforcement.
Beyond the wood, inspect joints and hardware. Dowel joints, mortise and tenon, and dovetails each respond differently to intervention. If parts have separated, you’ll need to devise a plan that respects the original joinery, or responsibly reassemble with compatible methods that preserve the piece’s character.
2) Key Safety Steps Before You Start
Safety is the foundation of any successful restoration. Work in a well-ventilated space to mitigate inhalation of fumes from finishes and solvents. Equip yourself with appropriate PPE: safety glasses, a respirator or dust mask for sanding, gloves, and hearing protection for powered tools. Keep a fire-safe setup nearby, especially when using solvents or heating tools, and never work near open flames.
Workspace order matters. Clear the area, secure the piece, and keep tools organized. When dealing with finishes, test a small, inconspicuous area first to gauge how the wood and the finish will respond. If a finish contains unknown components, treat it as potentially hazardous and exercise caution during removal or stripping.
3) Essential Tools for Beginners
Starting a restoration kit doesn’t require a fortune. A thoughtful set of tools will cover most beginner-to-intermediate projects. Key items include:
- Protective gear: respirator, gloves, safety glasses
- Basic hand tools: screwdrivers, hammer, pincers, chisels
- Sanding essentials: a sanding block, 120–220 grit sandpaper, and a random-orbit sander for larger pieces
- Finishing supplies: rags, brushes, tack cloths, mineral spirits or denatured alcohol for cleanup
- Stripping and prep: chemical stripper (if necessary), steel wool, putty knives
- Adhesives and clamps: wood glue, corner snares, and assorted clamps for reassembly
4) The Step-by-Step Path: From Assessment to Finish
By following a structured sequence, you minimize risk and maximize results. A practical flow is:
- Document the piece: take notes and photos of joints, grain direction, and any repairs.
- Careful disassembly if needed, labeling parts for reassembly.
- Remove finish using a method that respects the wood and the existing patina. Light stripping may be enough; aggressive stripping risks removing character.
- Repair structural issues: re-glue joints, reinforce weak areas, and address any wood movement with appropriate care.
- Prepare the surface: smooth sanding with progressive grits to reveal a clean base.
- Choose a finish that suits the wood and desired patina: oils and waxes for a natural look, or a polyurethane for durability in high-use pieces.
- Apply the finish with care, in thin, even coats, allowing proper curing time between steps.
5) Beginner Project Ideas to Build Confidence
Three approachable projects crystallize the process and offer tangible wins for new restorers. Each project is designed to deliver visible transformation while reinforcing best practices.
- Restoring a Wooden Chair: address a wobbly frame, re-glue joints, and refinish the seat with a simple oil or wax finish to highlight the wood’s grain.
- Refinishing a Table: strip or clean the surface, repair any minor damage, and apply a straightforward oil or wax finish to emphasize warmth and durability.
- Basic Upholstery for a Reclaimed Frame: replace or reinforce webbing and cushions with affordable fabric choices, focusing on staple technique and frame stability.
6) Finishes: Oil, Wax, and Protective Coatings
Finishes are the final voice of the piece. Oil finishes penetrate the wood, enhancing depth and grain while offering a natural feel. Waxes seal and add a removable layer of protection, while polyurethane or water-based finishes provide greater durability for pieces with high wear. The choice depends on usage, desired aesthetic, and whether you want to preserve the delicate patina of age.
Test finishes on scrap wood or inconspicuous areas to compare how the finish changes color, clarity, and texture. Remember that the season and humidity can influence drying times and results.
7) Sourcing Materials Responsibly
Beginner restorers can source responsibly through local salvage yards, antique shops, and reputable reclaimers. Sourcing is not just about price; it’s about provenance, the environmental impact of materials, and the humane treatment of workers in the supply chain. When possible, choose locally made finishes and sustainably harvested woods to minimize footprint and maximize transparency in the restoration journey.
8) A Brief Editorial Look at Time and Craft
In every era, people have looked to craft as a form of stewardship—preserving wood’s legacy, honoring skilled hands, and transforming discarded objects into meaningful utilities. From 18th-century cabinetmakers to mid-century modern restorers and today’s sustainable-minded artisans, the arc remains defined by patient labor, a respect for natural materials, and an invitation to readers to participate in a tradition of careful care. This guide embraces that lineage, presenting a practical, accessible pathway for modern households to engage with reclaimed furniture’s enduring value.
9) Influential Figures Across Time: Three Key Individuals
Restoration and woodworking have always thrived at the intersection of artistry and utility. Here are three figures from different periods who left a mark on how we understand and practice solid-wood restoration.
- Georgius Agricola (16th century): Although primarily known as a mineralogist and father of mineralogy, his era’s workshop culture underscored meticulous material examination. The emphasis on understanding the properties of timber and finishes echoes today’s practice of assessing wood type and condition before intervention.
- Paul Lachance (mid-20th century): A progressive American cabinetmaker whose attention to joinery and finish laid groundwork for modern revival studios. Lachance’s mix of traditional craft with practical finishes resonates with today’s approach to durable, honest finishes on reclaimed pieces.
- Anna Vîșcovic (late 20th to early 21st century): A contemporary conservationist and artisan who championed non-toxic finishes and low-odor stripping methods. Her advocacy for safer, more sustainable restoration practices informs today’s safety-first restoration ethos.
10) A Brief Case Study: The Vermont Shaker Bed as a Model Project
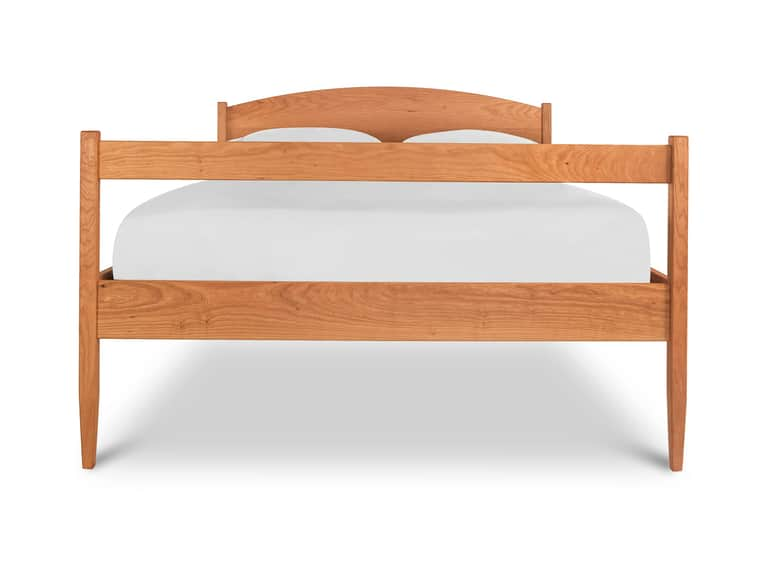
The Vermont Shaker Bed, crafted to order in Vermont from solid hardwoods, offers a grounded template for a first restoration project. Its platform-bed construction, curved headboard, and traditional blanket rail present tangible design cues that guide joint repair, surface preparation, and finishing choices. Working with such a piece invites a measured approach: stabilize loose joints, preserve the natural patina where possible, and apply a finish that honors the wood’s lineage. This project model underscores the article’s principle: restoration is as much about listening to a piece as it is about applying technique.
11) Bringing It All Home: A Practical Path Forward
Restoring solid wood furniture is not merely about making a piece look new—it is about extending a piece’s life, reducing waste, and celebrating the craft that makes a home feel anchored in time. This guide aims to empower readers to begin with confidence, cultivate patience, and build a repertoire of repeatable techniques. As you gain experience, the scope expands—from a single chair to a whole room’s worth of reclaimed wood that carries a coherent, responsible aesthetic.
A Note on Products and Examples
As you explore projects, you may consider working with established pieces that align with restoration goals. The Vermont Shaker Bed exemplifies a durable, design-forward option for a first significant project. It speaks to the ethos of solid wood, clean lines, and long-term durability. For a companion side piece or accessory, the Heartwood Shaker Lamp Table represents the same values in a smaller scale, offering a practical test bed for finishing techniques and assembly discipline.
Vermont Shaker Bed
Handcrafted solid hardwood bed with curved headboard and traditional blanket rail. Platform bed to last for generations. Wood options: natural cherry, maple, or walnut.
Price: 3188.00
Heartwood Shaker Lamp Table
Handmade in Vermont from premium solid wood with an eco-friendly oil finish. Finish options: natural cherry, maple, or walnut.
Price: 1274.00
Note: Product details given here reflect catalog entries and may vary by wood choice and finish. The Vermont Shaker Bed is presented as a representative project option for readers engaging in solid wood restoration.